Setting up an Offer – Targeting

The Targeting section contains 7 various options through which you can set the targets for your offer.

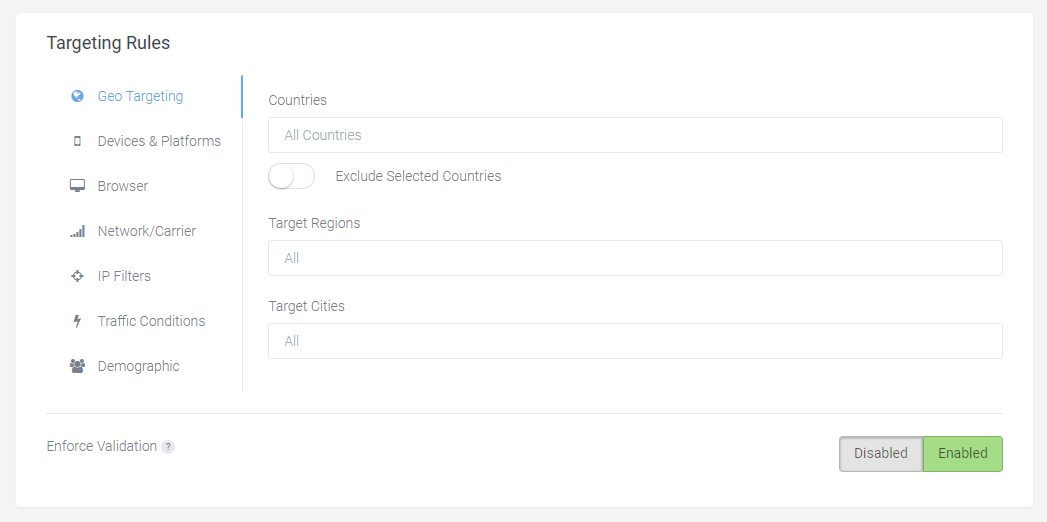
  • Geo Targeting: Manage your traffic by using “Include” for target and “Exclude” for non-target countries by selecting the button below Countries field. You can choose specific regions and  cities in particular country as well.
    Please note that: If you include/exclude some particular regions in a country, the other regions will be included/excluded automatically and vice versa.
  • Device & Platform Targeting: You can set targets for devices according to parameters: device type and platform/OS.
  • Browser Targeting: You can set targets for offers according to mobile browsers.
  • Network/ Carrier Targeting: You can set targets for offers according to connection types and mobile carries such as Mobile Network, Wifi, Cable/DSL etc.
    Please note that: The mobile carriers will only display once you have included/excluded countries in Geo targeting.
  • IP Targeting: You can set the IP targets by allowing or blocking specific IP formats.
  • Traffic Targeting: You can set the target for offers based on the allowed or denied traffic types. Traffic could be banner, social media, email etc.
  • Demographic Targeting: You can set the target based on gender and age.

Enforce Validation:  If this option is ‘Enabled’, the OffersHub server will validate the traffic under Geo, Carrier and IP targeting rules and only the valid clicks will be redirected to advertiser’s landing page.

Setting up an Offer – Offer Access

Offer Access allows you to set the restrictions to your offer.

Public: By default, offer would be public and all the affiliates would be able to access and send traffic to this offer.

Required Approval: This option is for affiliates wherein they have to get the offer approved before pushing the traffic for the offer.

Private: This option allows you to make an offer private that hides the offer from other affiliates and allows you to grant the access to selected affiliates.

Setting up an Offer – Offer Details

To create a new offer in OffersHub, go to Offers > Create Offer.  The first section of this form is Offer Details, where you enter your offer’s basic information.

Advertiser: Select the advertiser for your offer from the list of advertisers defined in your network. If you haven’t set up any advertisers yet, leave this blank. You can edit the offer later to set your advertiser.

Name: Give the name to your Offer. Give your offer a clear name that your affiliates will understand.

 Description: Brief summary of the offer. Affiliates/advertisers viewing this offer will read the description to have an idea of what is being promoted.

Preview URL: This URL should be provided to you by the offer’s advertiser. It’s the URL where affiliates can see the offer’s landing page.

Image Preview (This field is optional): You can upload an image to set the image preview of the offer. The image format could be jpg, png or gif. Resolutions must not exceed 1500*1500 and max allowed size is 2mb.

Offer Category: This is where you select offer category to associate with this offer from the list of active categories provided to you in the platform.

Expire Date : Here you can define the expiry date of the offer.

Quick Glimpse of our Dashboard

OffersHub offers a very dynamic and attractive real-time dashboard through which one can easily keep the track on the stats such as Clicks, Conversions, Unqiue clicks, Conversion Ratio, Revenue, Payout etc.

The dashboard lets you to keep a daily track with the help of the graph which represents Clicks, Conversions and Revenue. You can change the stats from the drop down provided on the top right of the panel. This will allow you to review the stats of the same day, a day before, last 7 days, last month and last quarter.